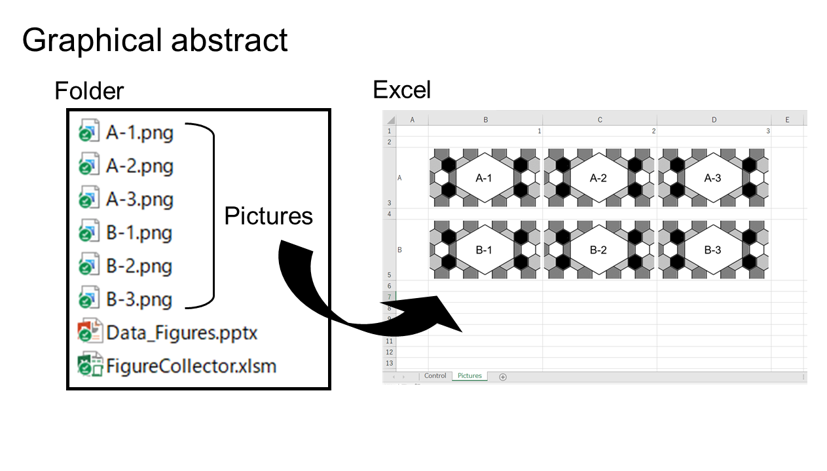
本記事では、複数の画像を取り込んでExcelシートに並べるVBAコードを紹介します。
ここでは、以下の記事で紹介しているExcelファイル(FigureCollector.xlsm)で用いているVBA(Visual Basic for Application)コードを紹介します。

シートと連携したコードになっていますので、本コードおよびExcelファイルの使い方は上記の記事を確認してください。

以下の記事でVBAを利用する上で、必要な最低限の設定方法と作業方法を紹介しています。必要に応じて、ご確認ください。

コードの全体像
コードの一覧
' メインのサブルーチン
' 画像を挿入して並べる
Sub InsertPictures_asTable()
    Dim sh_ctrl As Worksheet
    Dim rg_sheet As Range
    Dim rg_row As Range
    Dim rg_col As Range
    Dim rg_cell As Range
    Dim rg As Range

    Dim sh_pict As Worksheet

    Dim no_sh, no_row, no_col As Long

    Dim base_path As String
    Dim file_name0, file_name As String
    Dim height As Double

    Dim sh_name As String

    Dim ix, iy, ish As Long

    ' sheetとrangeの設定
    Set sh_ctrl = Sheets("Control")
    With sh_ctrl
        Set rg_sheet = .Range("e2")
        Set rg_row = .Range("f2")
        Set rg_col = .Range("g2")
        Set rg_cell = .Range("h2")
    End With

    ' 基本情報の読み込み
    With sh_ctrl
        base_path = .Range("c3")
        file_name0 = .Range("c4")
        height = .Range("c5")
    End With
    ' 相対パス"."を取得
    If base_path = "." Then
        base_path = ActiveWorkbook.Path
        'MsgBox base_path
    End If

    ' sheet数の取得
    With rg_sheet
        If .Offset(1, 0) = "" Then
            .Offset(1, 0) = "Pictures"
        End If

        no_sh = count_continuous_cells(.Offset(1, 0), "down")

    End With

    ' row数の取得
    i1 = count_continuous_cells(rg_row.Offset(1, 0), "down")
    i2 = count_continuous_cells(rg_cell.Offset(1, 0), "down")
    no_row = get_bigger(i1, i2)

    ' column数の取得
    i1 = count_continuous_cells(rg_col.Offset(1, 0), "down")
    i2 = count_continuous_cells(rg_cell.Offset(1, 0), "right")
    no_col = get_bigger(i1, i2)

    ' ファイルの取得
    For ish = 1 To no_sh
        ' シートの追加
        sh_name = rg_sheet.Offset(ish, 0)
        If exist_sheet(sh_name) Then
            Set sh_pict = Sheets(sh_name)
        Else
            Set sh_pict = Worksheets.Add(after:=Worksheets(Worksheets.count))
            sh_pict.Name = sh_name
        End If
        sh_pict.Select

        For iy = 1 To no_row
            For ix = 1 To no_col
                ' 画像名を取得
                file_name = file_name0
                file_name = Replace(file_name, "{s}", "{sheet}")
                file_name = Replace(file_name, "{r}", "{row}")
                file_name = Replace(file_name, "{c}", "{column}")
                file_name = Replace(file_name, "{sheet}", sh_name)
                file_name = Replace(file_name, "{row}", rg_row.Offset(iy, 0))
                file_name = Replace(file_name, "{column}", rg_col.Offset(ix, 0))
                file_name = Replace(file_name, "{cell}", rg_cell.Offset(iy, ix - 1))

                ' 画像を挿入するセルを取得
                Set rg = sh_pict.Range("a1").Offset(iy * 2, ix)
                ' セルの高さを設定
                rg.RowHeight = height
                ' Ctrolで入力したCell値をセルに代入
                rg.Offset(-1, 0).Value = rg_cell.Offset(iy, ix - 1)
                ' 画像の挿入(Ifはファイルの存在を確認)
                If Dir(base_path & "\" & file_name) <> "" Then
                    Call InsertPicture_inCell(base_path & "\" & file_name, sh_pict, rg)
                    ' 画像名を画像の上のセルに入力
                    rg.Offset(-1, 0).Value = file_name
                Else
                    ' ファイルが存在しなかった場合は指定された画像のパスをセルに入力
                    rg.Value = base_path & "\" & file_name
                End If
            Next
        Next

        With sh_pict.Range("a1")
            ' Controlで入力したColumnの値を代入
            Range(.Offset(0, 1), .Offset(0, no_col)) = WorksheetFunction.Transpose(Range(rg_col.Offset(1, 0), rg_col.Offset(no_col, 0)).Value)
            ' Controlで入力したRowの値を代入
            For iy = 1 To no_row
                .Offset(iy * 2, 0) = rg_row.Offset(iy, 0).Value
            Next
        End With

        ' セルの幅を調整
        For ix = 1 To no_col
            If sh_pict.Shapes.count <> 0 Then
                With sh_pict.Range("a1").Offset(0, ix)
                    .ColumnWidth = .ColumnWidth / .width * sh_pict.Shapes(sh_pict.Shapes.count).width * 1.1
                End With
            End If
        Next
    Next

    sh_ctrl.Select
    'MsgBox no_sh & no_row & no_col

End Sub

' セル内に画像を挿入
Sub InsertPicture_inCell( _
    file_path As String, sh As Worksheet, rg As Range, _
    Optional height As Double = 0, _
    Optional r_fsize As Double = 0.95, _
    Optional flag_paste_as_jpeg As Boolean = True, _
    Optional r_pfsize As Double = 2 _
    )
    ' file_path : 画像のパス
    ' sh : 画像を張り付けるシート
    ' rg : 画像を配置するセル
    ' height : 基準高さ default = 0 => rg.height
    ' r_fsize : 基準高さと画像の高さの比 default = 0.95 ---基準高さより若干小さくする
    ' flag_paste_as_jpeg : default = True --- 画像をJPEG形式で張り付けて軽量化する
    ' r_pfsize : JPEG形式で張り付けるときの高さと基準高さの比

    ' 画像
    Dim sp As shape

    Dim count As Long
    Dim flag_success As Boolean

    If height <= 0 Then
        ' 基準高さをrg.heightに設定
        height = rg.height
    End If

    ' 画像を挿入
    Set sp = sh.Shapes.AddPicture( _
      Filename:=file_path, _
      LinkToFile:=msoFalse, _
      SaveWithDocument:=msoTrue, _
      Left:=0, _
      Top:=0, _
      width:=0, _
      height:=0 _
    )

    ' 挿入した画像のサイズを調整
    With sp
        ' 画像のサイズを変更 1: 1倍, msoTrue: 元画像のサイズを基準
        .ScaleHeight 1, msoTrue
        .ScaleWidth 1, msoTrue
        ' 画像の縦横比を固定
        .LockAspectRatio = msoTrue
        ' 画像サイズと位置の調整
        .height = height * r_fsize
        .Left = rg.Left + height * (1 - r_fsize) / 2
        .Top = rg.Top + height * (1 - r_fsize) / 2
        ' セルの移動に併せて画像を移動(サイズの変更は無)
        .Placement = xlMove
    End With

    ' 画像をJPEG形式で張り付けて軽量化する
    ' r_pfsizeが解像度と容量に影響
    If flag_paste_as_jpeg Then
        count = 0
        ' 画像のサイズを変更
        sp.height = height * r_pfsize

        ' 貼り付け失敗時に再試行するようエラー処理を設定
        On Error GoTo myError
            ' 画像をコピー
            sp.Copy
            ' 画像をJPEG形式で貼り付け
            sh.PasteSpecial Format:="図 (JPEG)"
        ' エラー処理の解除
        On Error GoTo 0
            ' 貼り付け後の画像=shapesオブジェクトの最後の画像
            With sh.Shapes(sh.Shapes.count)
                ' 画像サイズと位置の調整
                .height = height * r_fsize
                .Left = rg.Left + height * (1 - r_fsize) / 2
                .Top = rg.Top + height * (1 - r_fsize) / 2
            End With
            ' 貼り付け前の画像を削除
            sp.Delete
            flag_success = True
            Exit Sub
' 貼り付けの失敗時に再実行
myError:
            count = count + 1
            Debug.Print count & " " & file_path
            ' 最大実行回数20回
            If count >= 20 Then
                MsgBox "Unpasteable " & file_path
                Exit Sub
            End If
            ' 再実行にあたりインターバルを設定
            Application.Wait Now() + TimeValue("00:00:01") * count
        ' エラーが発生した行に戻る
        Resume
    End If
End Sub

' ディレクトリの選択
Sub Select_Directry()
    Dim sh_ctrl As Worksheet
    Set sh_ctrl = Sheets("Control")

    ' ディレクトリ選択ダイアログ
    With Application.FileDialog(msoFileDialogFolderPicker)
        If .Show = True Then
            ' 選択したパスを入力
            sh_ctrl.Range("c3") = .SelectedItems(1)
        End If
    End With
End Sub

' シートが存在するか判定
Function exist_sheet(sh_name As String) As Boolean
    Dim sh As Worksheet
    Dim flag As Boolean

    flag = False

    For Each sh In Worksheets
        If sh_name = sh.Name Then
            flag = True
        End If
    Next

    exist_sheet = flag

End Function

' val1, val2の内大きい値を取得
Function get_bigger(val1 As Variant, val2 As Variant) As Variant
    Dim val As Variant

    If val1 <= val2 Then
        val = val2
    Else
        val = val1
    End If

    get_bigger = val

End Function

' 連続して入力されているセル数の取得
Function count_continuous_cells(rg_start As Range, direction As String)
    Dim icount As Long

    ' 下方向
    If direction = "down" Then
        With rg_start
            If .Offset(1, 0) = "" Then
                If .Value = "" Then
                    icount = 0
                Else
                    icount = 1
                End If
            Else
                icount = .End(xlDown).Row - .Row + 1
            End If
        End With
    ' 右方向
    ElseIf direction = "right" Then
        With rg_start
            If .Offset(0, 1) = "" Then
                If .Value = "" Then
                    icount = 0
                Else
                    icount = 1
                End If
            Else
                icount = .End(xlToRight).Column - .Column + 1
            End If
        End With
    ' 規定の方向以外(Error)
    Else
        icount = 0
        MsgBox (direction & " is unsapported direction.")
    End If

    count_continuous_cells = icount

End Function
サブルーチンの一覧
メインのサブルーチンは以下の3つです。
' <Select Directory>ボタンをクリック時に実行
' ディレクトリの選択ダイアログを表示してディレクトリパスを取得
Sub Select_Directry()


' <Insert Pictures>ボタンをクリック時に実行
' 画像を挿入して並べる
Sub InsertPictures_asTable()


' 画像を挿入するサブルーチン
' InsertPictures_asTable()から呼び出される
Sub InsertPicture_inCell( _
    file_path As String, sh As Worksheet, rg As Range, _
    Optional height As Double = 0, _
    Optional r_fsize As Double = 0.95, _
    Optional flag_paste_as_jpeg As Boolean = True, _
    Optional r_pfsize As Double = 2 _
    )
    ' file_path : 画像のパス
    ' sh : 画像を張り付けるシート
    ' rg : 画像を配置するセル
    ' height : 基準高さ default = 0 => rg.height
    ' r_fsize : 基準高さと画像の高さの比 default = 0.95 ---基準高さより若干小さくする
    ' flag_paste_as_jpeg : default = True --- 画像をJPEG形式で張り付けて軽量化する
    ' r_pfsize : JPEG形式で張り付けるときの高さと基準高さの比
メインのサブルーチン以外に、以下のサブルーチン(関数)を使用しています。
' シートが存在するか判定
Function exist_sheet(sh_name As String) As Boolean
    ' sh_name : シート名


' val1, val2の内大きい値を取得
Function get_bigger(val1 As Variant, val2 As Variant) As Variant


' 連続して入力されているセル数の取得
Function count_continuous_cells(rg_start As Range, direction As String)
    ' rg_start : 基準となるセル
' direction : セルの連続方向("down":下, "right":右)Select_Directry()(ディレクトリの選択)
実行タイミング
<Select Directory>ボタンを押したときに実行されます。
機能
ディレクトリ選択ダイアログを開き、選択されたディレクトリのパスをセルに入力します。
コード
' ディレクトリの選択
Sub Select_Directry()
    Dim sh_ctrl As Worksheet
    Set sh_ctrl = Sheets("Control")

    ' ディレクトリ選択ダイアログ
    ' Application.FileDialog():ファイルダイアログ
    '   msoFileDialogFolderPicker:ディレクトリ選択ダイアログ
    '   .Show:ダイアログの表示
    '   .SelectedItem(i): 選択されたアイテムのi番目の値を取得
    With Application.FileDialog(msoFileDialogFolderPicker)
        If .Show = True Then
            ' 選択したパスを入力
            sh_ctrl.Range("c3") = .SelectedItems(1)
        End If
    End With
End Sub
InsertPictures_asTable()
実行タイミング
<Insert Pictures>ボタンを押したときに、実行されます。
機能
“Control”シートから情報を読み取り、画像の挿入と配置を実施します。
画像の挿入自体はInsertPicture_inCell()にて実行します。
コード
' 画像を挿入して並べる
Sub InsertPictures_asTable()
    Dim sh_ctrl As Worksheet
    Dim rg_sheet As Range
    Dim rg_row As Range
    Dim rg_col As Range
    Dim rg_cell As Range
    Dim rg As Range

    Dim sh_pict As Worksheet

    Dim no_sh, no_row, no_col As Long

    Dim base_path As String
    Dim file_name0, file_name As String
    Dim height As Double

    Dim sh_name As String

    Dim ix, iy, ish As Long

    ' sheetとrangeの設定
    Set sh_ctrl = Sheets("Control")
    With sh_ctrl
        Set rg_sheet = .Range("e2")
        Set rg_row = .Range("f2")
        Set rg_col = .Range("g2")
        Set rg_cell = .Range("h2")
    End With

    ' 基本情報の読み込み
    With sh_ctrl
        base_path = .Range("c3")
        file_name0 = .Range("c4")
        height = .Range("c5")
    End With
    ' 相対パス"."を取得
    If base_path = "." Then
        base_path = ActiveWorkbook.Path
        'MsgBox base_path
    End If

    ' sheet数の取得
    With rg_sheet
        If .Offset(1, 0) = "" Then
            .Offset(1, 0) = "Pictures"
        End If

        no_sh = count_continuous_cells(.Offset(1, 0), "down")

    End With

    ' row数の取得
    i1 = count_continuous_cells(rg_row.Offset(1, 0), "down")
    i2 = count_continuous_cells(rg_cell.Offset(1, 0), "down")
    no_row = get_bigger(i1, i2)

    ' column数の取得
    i1 = count_continuous_cells(rg_col.Offset(1, 0), "down")
    i2 = count_continuous_cells(rg_cell.Offset(1, 0), "right")
    no_col = get_bigger(i1, i2)

    ' ファイルの取得
    For ish = 1 To no_sh
        ' シートの追加
        sh_name = rg_sheet.Offset(ish, 0)
        If exist_sheet(sh_name) Then
            Set sh_pict = Sheets(sh_name)
        Else
            Set sh_pict = Worksheets.Add(after:=Worksheets(Worksheets.count))
            sh_pict.Name = sh_name
        End If
        sh_pict.Select

        For iy = 1 To no_row
            For ix = 1 To no_col
                ' 画像名を取得
                file_name = file_name0
                file_name = Replace(file_name, "{s}", "{sheet}")
                file_name = Replace(file_name, "{r}", "{row}")
                file_name = Replace(file_name, "{c}", "{column}")
                file_name = Replace(file_name, "{sheet}", sh_name)
                file_name = Replace(file_name, "{row}", rg_row.Offset(iy, 0))
                file_name = Replace(file_name, "{column}", rg_col.Offset(ix, 0))
                file_name = Replace(file_name, "{cell}", rg_cell.Offset(iy, ix - 1))

                ' 画像を挿入するセルを取得
                Set rg = sh_pict.Range("a1").Offset(iy * 2, ix)
                ' セルの高さを設定
                rg.RowHeight = height
                ' Ctrolで入力したCell値をセルに代入
                rg.Offset(-1, 0).Value = rg_cell.Offset(iy, ix - 1)
                ' 画像の挿入(Ifはファイルの存在を確認)
                If Dir(base_path & "\" & file_name) <> "" Then
                    Call InsertPicture_inCell(base_path & "\" & file_name, sh_pict, rg)
                    ' 画像名を画像の上のセルに入力
                    rg.Offset(-1, 0).Value = file_name
                Else
                    ' ファイルが存在しなかった場合は指定された画像のパスをセルに入力
                    rg.Value = base_path & "\" & file_name
                End If
            Next
        Next

        With sh_pict.Range("a1")
            ' Controlで入力したColumnの値を代入
            Range(.Offset(0, 1), .Offset(0, no_col)) = WorksheetFunction.Transpose(Range(rg_col.Offset(1, 0), rg_col.Offset(no_col, 0)).Value)
            ' Controlで入力したRowの値を代入
            For iy = 1 To no_row
                .Offset(iy * 2, 0) = rg_row.Offset(iy, 0).Value
            Next
        End With

        ' セルの幅を調整
        For ix = 1 To no_col
            If sh_pict.Shapes.count <> 0 Then
                With sh_pict.Range("a1").Offset(0, ix)
                    .ColumnWidth = .ColumnWidth / .width * sh_pict.Shapes(sh_pict.Shapes.count).width * 1.1
                End With
            End If
        Next
    Next

    sh_ctrl.Select
    'MsgBox no_sh & no_row & no_col

End Sub
コードの要点
InsertPictures_asTable()の中で要点となる部分をピックアップして記載します。
“Control”シートの”Sheet”欄に入力した情報を元に、画像を配列するシートを追加します。
' シート名の取得
sh_name = rg_sheet.Offset(ish, 0)
' シートの追加、すでに同名のシートが存在する場合はシートを追加しない
If exist_sheet(sh_name) Then
    Set sh_pict = Sheets(sh_name)
Else
    ' Worksheets.Add() :シートを追加
    '   after: ここで指定したシートの後にシートを追加
    Set sh_pict = Worksheets.Add(after:=Worksheets(Worksheets.count))
    ' シート名の変更
    sh_pict.Name = sh_name
End If
sh_pict.Select
“Control”シートの”filename”欄に入力されたファイル名について、代替記号(”{r}”等)を置換し画像名を取得します。
' 画像名を取得
file_name = file_name0
file_name = Replace(file_name, "{s}", "{sheet}")
file_name = Replace(file_name, "{r}", "{row}")
file_name = Replace(file_name, "{c}", "{column}")
file_name = Replace(file_name, "{sheet}", sh_name)
file_name = Replace(file_name, "{row}", rg_row.Offset(iy, 0))
file_name = Replace(file_name, "{column}", rg_col.Offset(ix, 0))
file_name = Replace(file_name, "{cell}", rg_cell.Offset(iy, ix - 1))

' Replace(txt, word1, word2)
'   txt内のword1をword2に置換した文字列を帰す。
'   txt, word1, word2はString型
画像を配置するセルの高さを調整します。
' セルの高さを設定
rg.RowHeight = heightInsertPicture_inCell()を実行して、画像を挿入します。
' 画像の挿入(Ifはファイルの存在を確認)
' base_path & "\" & file_name:画像のパス
' Dir(path):pathで指定したファイルが存在しない場合は""が返却される。
If Dir(base_path & "\" & file_name) <> "" Then
    Call InsertPicture_inCell(base_path & "\" & file_name, sh_pict, rg)
    ' 画像名を画像の上のセルに入力
    rg.Offset(-1, 0).Value = file_name
Else
    ' ファイルが存在しなかった場合は指定された画像のパスをセルに入力
    rg.Value = base_path & "\" & file_name
End If
画像を配置したセルの幅を調整します。
セルの幅は一番最後に挿入された画像の幅の1.1倍に設定しています。
' セル幅を調整
With sh_pict.Range("a1").Offset(0, ix)
    ' .ColumnWidthはRowHeightと異なりptで大きさを指定できないため、.ColumnWidth / .widthで単位を換算しています。
    ' .widhtの単位はptですが、.widthには値を代入できません。
    .ColumnWidth = .ColumnWidth / .width * sh_pict.Shapes(sh_pict.Shapes.count).width * 1.1
End With
InsertPicture_inCell()
実行タイミング
InsertPictures_asTable()から呼び出されます。
機能
- 画像を読み込んでシート内に配置します。
- 挿入した画像をJPEG形式で貼り付けし直すことで、ファイルサイズを低減します。
flag_paste_as_jpeg=Falseの場合は、この処理は実施されません。
画像の解像度はheightとr_pfsizeに依存します。 - 画像をセル内に配置します。
セル境界に重ねて画像を配置すると、画像がセルの移動に追従しない場合があるため、デフォルトではセルの若干内側に画像を配置するように設定しています。
コード
' セル内に画像を挿入
Sub InsertPicture_inCell( _
    file_path As String, sh As Worksheet, rg As Range, _
    Optional height As Double = 0, _
    Optional r_fsize As Double = 0.95, _
    Optional flag_paste_as_jpeg As Boolean = True, _
    Optional r_pfsize As Double = 2 _
    )
    ' file_path : 画像のパス
    ' sh : 画像を張り付けるシート
    ' rg : 画像を配置するセル
    ' height : 基準高さ default = 0 => rg.height
    ' r_fsize : 基準高さと画像の高さの比 default = 0.95 ---基準高さより若干小さくする
    ' flag_paste_as_jpeg : default = True --- 画像をJPEG形式で張り付けて軽量化する
    ' r_pfsize : JPEG形式で張り付けるときの高さと基準高さの比

    ' 画像
    Dim sp As shape

    Dim count As Long
    Dim flag_success As Boolean

    If height <= 0 Then
        ' 基準高さをrg.heightに設定
        height = rg.height
    End If

    ' 画像を挿入
    Set sp = sh.Shapes.AddPicture( _
      Filename:=file_path, _
      LinkToFile:=msoFalse, _
      SaveWithDocument:=msoTrue, _
      Left:=0, _
      Top:=0, _
      width:=0, _
      height:=0 _
    )

    ' 挿入した画像のサイズを調整
    With sp
        ' 画像のサイズを変更 1: 1倍, msoTrue: 元画像のサイズを基準
        .ScaleHeight 1, msoTrue
        .ScaleWidth 1, msoTrue
        ' 画像の縦横比を固定
        .LockAspectRatio = msoTrue
        ' 画像サイズと位置の調整
        .height = height * r_fsize
        .Left = rg.Left + height * (1 - r_fsize) / 2
        .Top = rg.Top + height * (1 - r_fsize) / 2
        ' セルの移動に併せて画像を移動(サイズの変更は無)
        .Placement = xlMove
    End With

    ' 画像をJPEG形式で張り付けて軽量化する
    ' r_pfsizeが解像度と容量に影響
    If flag_paste_as_jpeg Then
        count = 0
        ' 画像のサイズを変更
        sp.height = height * r_pfsize

        ' 貼り付け失敗時に再試行するようエラー処理を設定
        On Error GoTo myError
            ' 画像をコピー
            sp.Copy
            ' 画像をJPEG形式で貼り付け
            sh.PasteSpecial Format:="図 (JPEG)"
        ' エラー処理の解除
        On Error GoTo 0
            ' 貼り付け後の画像=shapesオブジェクトの最後の画像
            With sh.Shapes(sh.Shapes.count)
                ' 画像サイズと位置の調整
                .height = height * r_fsize
                .Left = rg.Left + height * (1 - r_fsize) / 2
                .Top = rg.Top + height * (1 - r_fsize) / 2
            End With
            ' 貼り付け前の画像を削除
            sp.Delete
            flag_success = True
            Exit Sub
' 貼り付けの失敗時に再実行
myError:
            count = count + 1
            Debug.Print count & " " & file_path
            ' 最大実行回数20回
            If count >= 20 Then
                MsgBox "Unpasteable " & file_path
                Exit Sub
            End If
            ' 再実行にあたりインターバルを設定
            Application.Wait Now() + TimeValue("00:00:01") * count
        ' エラーが発生した行に戻る
        Resume
    End If
End Sub
コードの要点
InsertPicture_inCell()の中で要点となる部分をピックアップして記載します。
画像を挿入し、基本的な設定を行う。
' 画像を挿入
Set sp = sh.Shapes.AddPicture( _
  Filename:=file_path, _
  LinkToFile:=msoFalse, _
  SaveWithDocument:=msoTrue, _
  Left:=0, _
  Top:=0, _
  width:=0, _
  height:=0 _
)

' 画像に対して基本的な設定を行う
With sp
    ' 画像のサイズを変更 1: 1倍, msoTrue: 元画像のサイズを基準
    .ScaleHeight 1, msoTrue
    .ScaleWidth 1, msoTrue
    ' 画像の縦横比を固定
    .LockAspectRatio = msoTrue
    ' 画像サイズと位置の調整
    .height = height * r_fsize
    .Left = rg.Left + height * (1 - r_fsize) / 2
    .Top = rg.Top + height * (1 - r_fsize) / 2
    ' セルの移動に併せて画像を移動(サイズの変更は無)
    .Placement = xlMove
End With
JPEG形式で貼り付けを行い、ファイルを軽量化する。
クリップボードとのやり取りの問題だと思われますが、画像の貼り付けを連続実施するとエラーが発生します。エラー発生時はインターバルをおいて貼り付けの再実行を実施するように設定しており、インターバルは貼り付けの失敗回数に応じて長くなるように設定しています。
' r_pfsizeが解像度と容量に影響
If flag_paste_as_jpeg Then
    count = 0
    ' 画像のサイズを変更
    sp.height = height * r_pfsize

    ' 貼り付け失敗時に再試行するようエラー処理を設定
    On Error GoTo myError
        ' 画像をコピー
        sp.Copy
        ' 画像をJPEG形式で貼り付け
        sh.PasteSpecial Format:="図 (JPEG)"
    ' エラー処理の解除
    On Error GoTo 0
        ' 貼り付け後の画像=shapesオブジェクトの最後の画像
        With sh.Shapes(sh.Shapes.count)
            ' 画像サイズと位置の調整
            .height = height * r_fsize
            .Left = rg.Left + height * (1 - r_fsize) / 2
            .Top = rg.Top + height * (1 - r_fsize) / 2
        End With
        ' 貼り付け前の画像を削除
        sp.Delete
        flag_success = True
        Exit Sub
' 貼り付けの失敗時に再実行
myError:
        count = count + 1
        Debug.Print count & " " & file_path
        ' 最大実行回数20回
        If count >= 20 Then
            MsgBox "Unpasteable " & file_path
            Exit Sub
        End If
        ' 再実行にあたりインターバルを設定
        Application.Wait Now() + TimeValue("00:00:01") * count
    ' エラーが発生した行に戻る
    Resume
End If
関連ページ

